The microscope in cell studies
Contents: 9 sections
The units, and why they matter more than they look
Almost every calculation error in this topic is a unit error rather than an arithmetic one, so the conversions are worth knowing cold.
| Unit | Symbol | In metres | Conversion |
|---|---|---|---|
| Millimetre | mm | 10⁻³ m | 1 mm = 1000 µm |
| Micrometre | µm | 10⁻⁶ m | 1 µm = 1000 nm |
| Nanometre | nm | 10⁻⁹ m | 1 nm = 10⁻³ µm |
The useful habit is to convert everything to micrometres first, do the arithmetic, and convert back only at the end if the question asks for something else. Most cell measurements sit naturally in micrometres, so this keeps the numbers between about 0.1 and 100 and makes a wrong answer look obviously wrong.
Magnification
magnification = image size ÷ actual size
Magnification has no units. It is a ratio of two lengths, so the units cancel, and writing "×1500 µm" is wrong.
The formula is used three ways, and a question can ask for any of them:
- magnification = image ÷ actual
- actual size = image ÷ magnification
- image size = actual × magnification
A reliable trick is the triangle: image size on top, actual size and magnification underneath. Cover the quantity you want and the arrangement of the other two tells you whether to divide or multiply.
Worked example
A photomicrograph shows a cell measuring 45 mm across. The actual cell is 30 µm across. What is the magnification?
Step 1: convert to the same unit. 45 mm = 45 × 1000 = 45 000 µm.
So the magnification is ×1500, with no units.
Notice that the answer is only right because both measurements were in micrometres. Leaving the image in millimetres would have given 1.5, which is a magnification of one and a half and would mean the drawing is roughly the size of the cell itself.
Working backwards
The same photomicrograph is printed at ×1500. A mitochondrion on it measures 3 mm long. How long is the real mitochondrion?
Two micrometres is a sensible length for a mitochondrion, which is the check worth doing: if an organelle comes out at 200 µm or 0.002 µm, the arithmetic is wrong, because a whole animal cell is only about 20 µm across.
Magnification and resolution are not the same thing
This is the distinction examiners return to most often, and the one students most often blur.
- Magnification is how much bigger the image is than the object.
- Resolution is the smallest distance between two points that can still be seen as two points rather than one.
Magnifying beyond the resolution gains nothing. The image gets larger and blurrier, and no new detail appears. This is called empty magnification, and it is the reason a light microscope cannot simply be pushed to ×100 000 to see ribosomes.
Resolution is limited by the wavelength of what is used to illuminate the specimen. Light has a wavelength of roughly 400 to 700 nm, which sets the limit of a light microscope at about 200 nm. A beam of electrons behaves as a much shorter wavelength, which is why an electron microscope resolves to about 0.5 nm and can show ribosomes and membranes that a light microscope can never separate.
Comparing the microscopes
| Light microscope | Electron microscope | |
|---|---|---|
| Illumination | Light | Beam of electrons |
| Maximum resolution | About 200 nm | About 0.5 nm |
| Useful magnification | Up to about ×1500 | Up to about ×500 000 |
| Specimen | Can be living | Must be dead, in a vacuum |
| Image colour | Can be natural or stained | Black and white, colour is added afterwards |
| Cost and size | Cheap, portable | Expensive, needs a dedicated room |
That the specimen must be dead is a real limitation, not a footnote. An electron microscope works in a vacuum, so no living process can be watched with one. Anything known about how organelles move or divide had to be inferred from many still images, or observed with a light microscope at lower resolution.
Transmission against scanning
- Transmission (TEM): electrons pass through an extremely thin section. Gives the highest resolution and a two-dimensional image of the internal structure. This is where images of cristae, grana and ribosomes come from.
- Scanning (SEM): electrons are bounced off the surface. Lower resolution than a TEM, but gives a three-dimensional view of the outside. This is where images of the surface of a leaf or a whole insect come from.
The quick way to tell them apart in a question: if the image shows the inside of something, it is a TEM; if it looks like an object you could pick up, it is an SEM.
The eyepiece graticule and stage micrometer
A graticule is a scale in the eyepiece. Its divisions are arbitrary until calibrated, because their apparent size changes whenever the objective lens changes.
The procedure is:
- Place a stage micrometer, a slide with a known scale, on the stage.
- Line up the graticule scale against it and count how many graticule divisions fit a known length.
- Divide to get the length of one graticule division at that magnification.
- Remove the micrometer and measure the specimen in graticule divisions.
Recalibrate every time the objective changes. A graticule calibrated on ×10 gives readings that are four times too large if used on ×40 without recalibration, and this is a favourite examination trap.
Common exam mistakes
- Giving magnification a unit. It is a ratio and has none.
- Doing the calculation without converting both measurements to the same unit first.
- Saying an electron microscope "magnifies more", when the point is that it resolves more. Higher magnification without higher resolution shows nothing new.
- Claiming an electron microscope shows living specimens.
- Forgetting to recalibrate the graticule after changing the objective lens.
- Confusing a TEM image with an SEM image: internal detail means transmission.
Exam technique
- Write the formula down before substituting. It earns credit even if the arithmetic then goes wrong, and it stops the divide-multiply mistake.
- Convert units as a separate written step so the examiner can see it.
- Sense-check every answer against a known size: a bacterium is about 1 µm, an animal cell about 20 µm, a plant cell up to about 100 µm.
- When asked to compare microscopes, give the numbers. "Better resolution" is worth less than "about 0.5 nm against about 200 nm".
Quick revision
- magnification = image ÷ actual, no units.
- 1 mm = 1000 µm; 1 µm = 1000 nm.
- Resolution is the smallest separation still seen as two points, and is limited by wavelength.
- Light: about 200 nm. Electron: about 0.5 nm.
- TEM goes through a thin section for internal detail; SEM bounces off a surface for a 3D view.
- Electron microscopes cannot show living material.
- Recalibrate the graticule whenever the objective lens changes.
Check you have it
Question 1
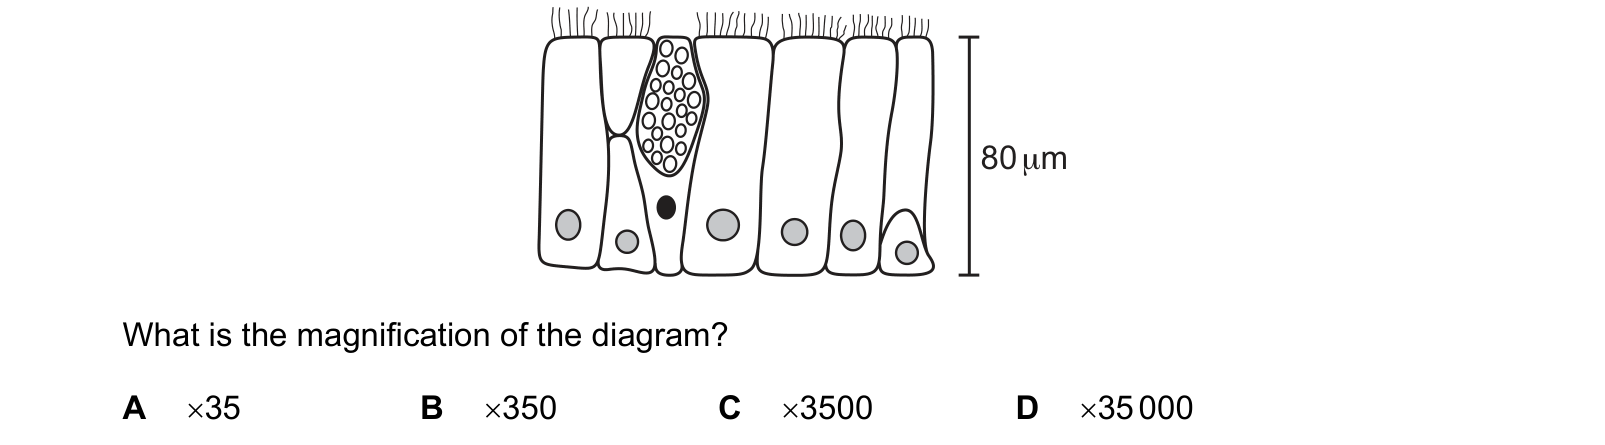
The diagram shows a section through epithelium found in part of the respiratory system. What is the magnification of the diagram?
Answer: B.
The scale bar next to the epithelium is labelled 80 µm, and on the paper it measures 28 mm. Convert the drawing's length to micrometres:
28 mm = 28 000 µm
magnification = 28 000 ÷ 80 = ×350, which is B.
The four options are all powers of ten apart, which tells you the examiner is testing the unit conversion rather than the arithmetic. ×35 is what you get from leaving the bar in millimetres and dividing by 80 twice over, ×3500 from converting the wrong way, and ×35 000 from treating the 80 µm as 80 nm.
A quick check on the biology: the epithelium drawn is about one cell tall, and 80 µm is a sensible height for a column of ciliated cells. If your magnification implies a cell a millimetre high, you have slipped a factor of a thousand somewhere.
Question 2
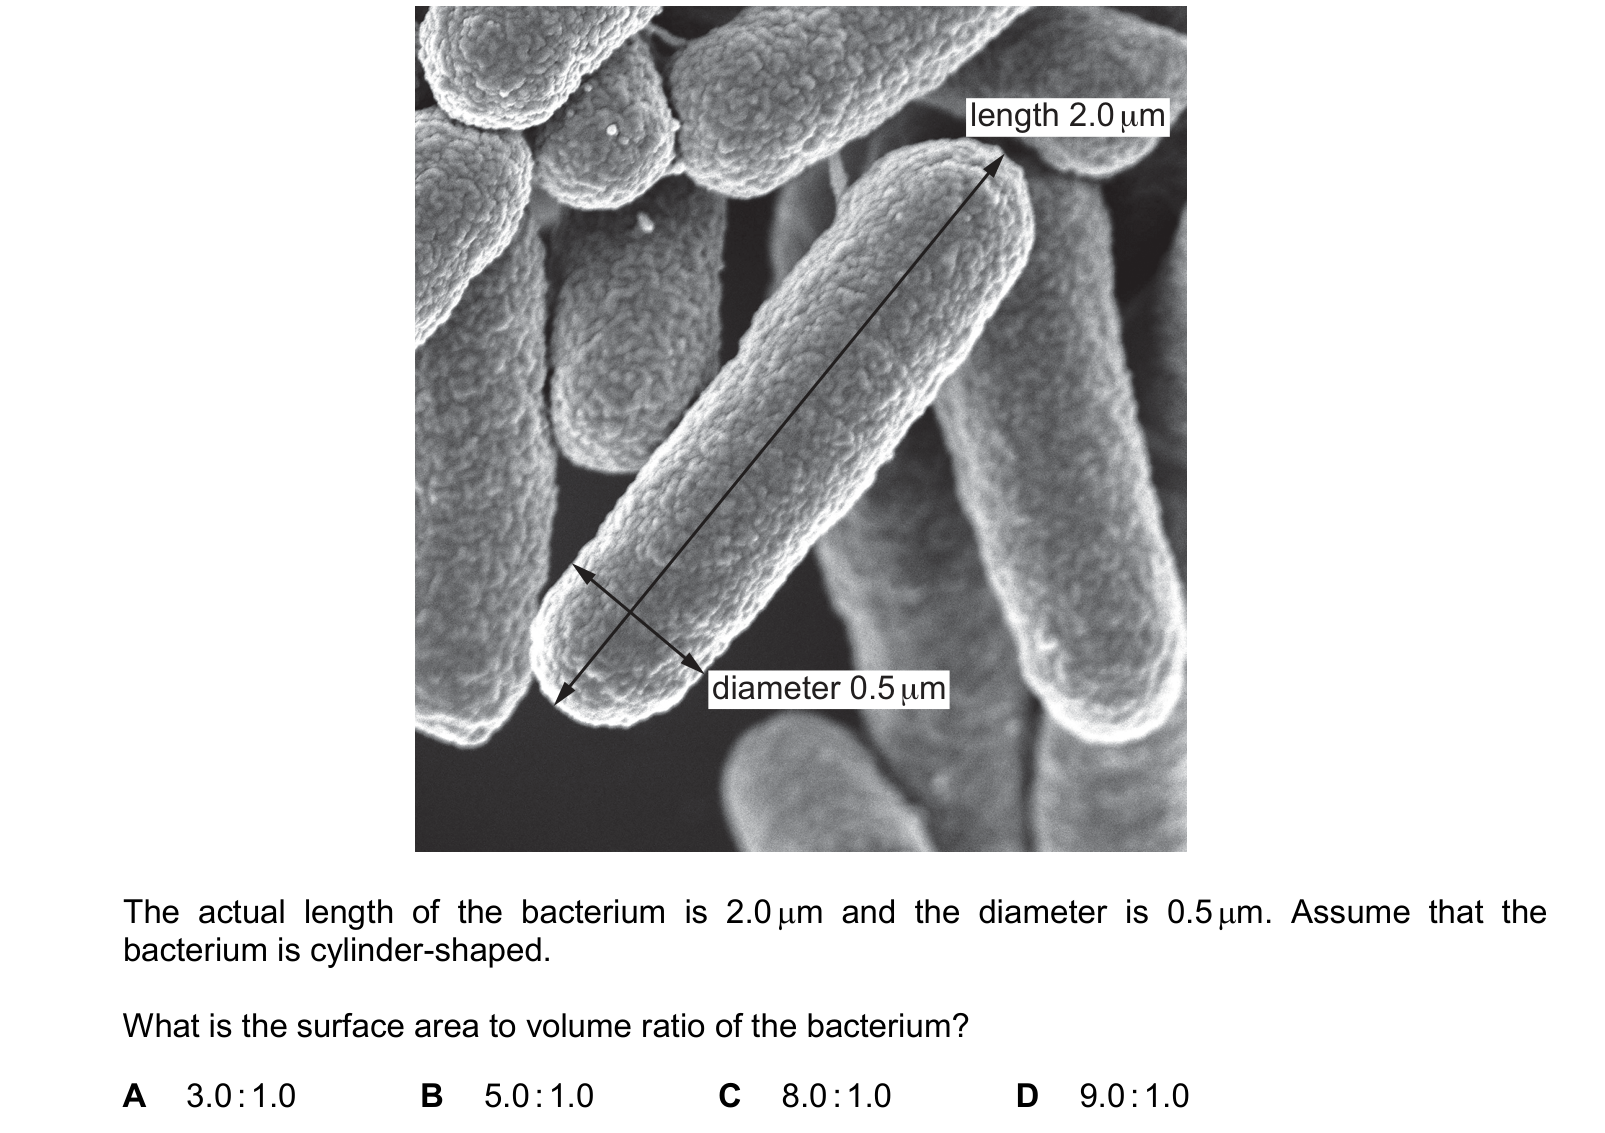
The electron micrograph shows rod-shaped bacteria. The actual length of the bacterium is 2.0 µm and the diameter is 0.5 µm. Assume that the bacterium is cylinder-shaped.
What is the surface area to volume ratio of the bacterium?
Answer: D.
diameter 0.5 µm, so r = 0.25 µm, and h = 2.0 µm.
Surface area = the curved side plus the two ends = 2πrh + 2πr²
= 2π(0.25)(2.0) + 2π(0.25)²
= 3.14 + 0.39 = 3.53 µm²
Volume = πr²h = π(0.25)²(2.0) = 0.39 µm³
ratio = 3.53 ÷ 0.39 = 9.0, so 9.0 : 1.0, which is D.
The commonest slip is using 0.5 as the radius, which doubles r and gives a ratio near 4.5. Halving the diameter first is the whole difficulty.
What the number means is worth more than the arithmetic. A surface area to volume ratio of 9 : 1 is enormous, and it is why a bacterium needs no transport system: every part of the cytoplasm is close enough to the surface for diffusion alone to supply it. The ratio falls as an organism gets larger, which is precisely why big organisms need lungs, blood and a heart.
Question 3
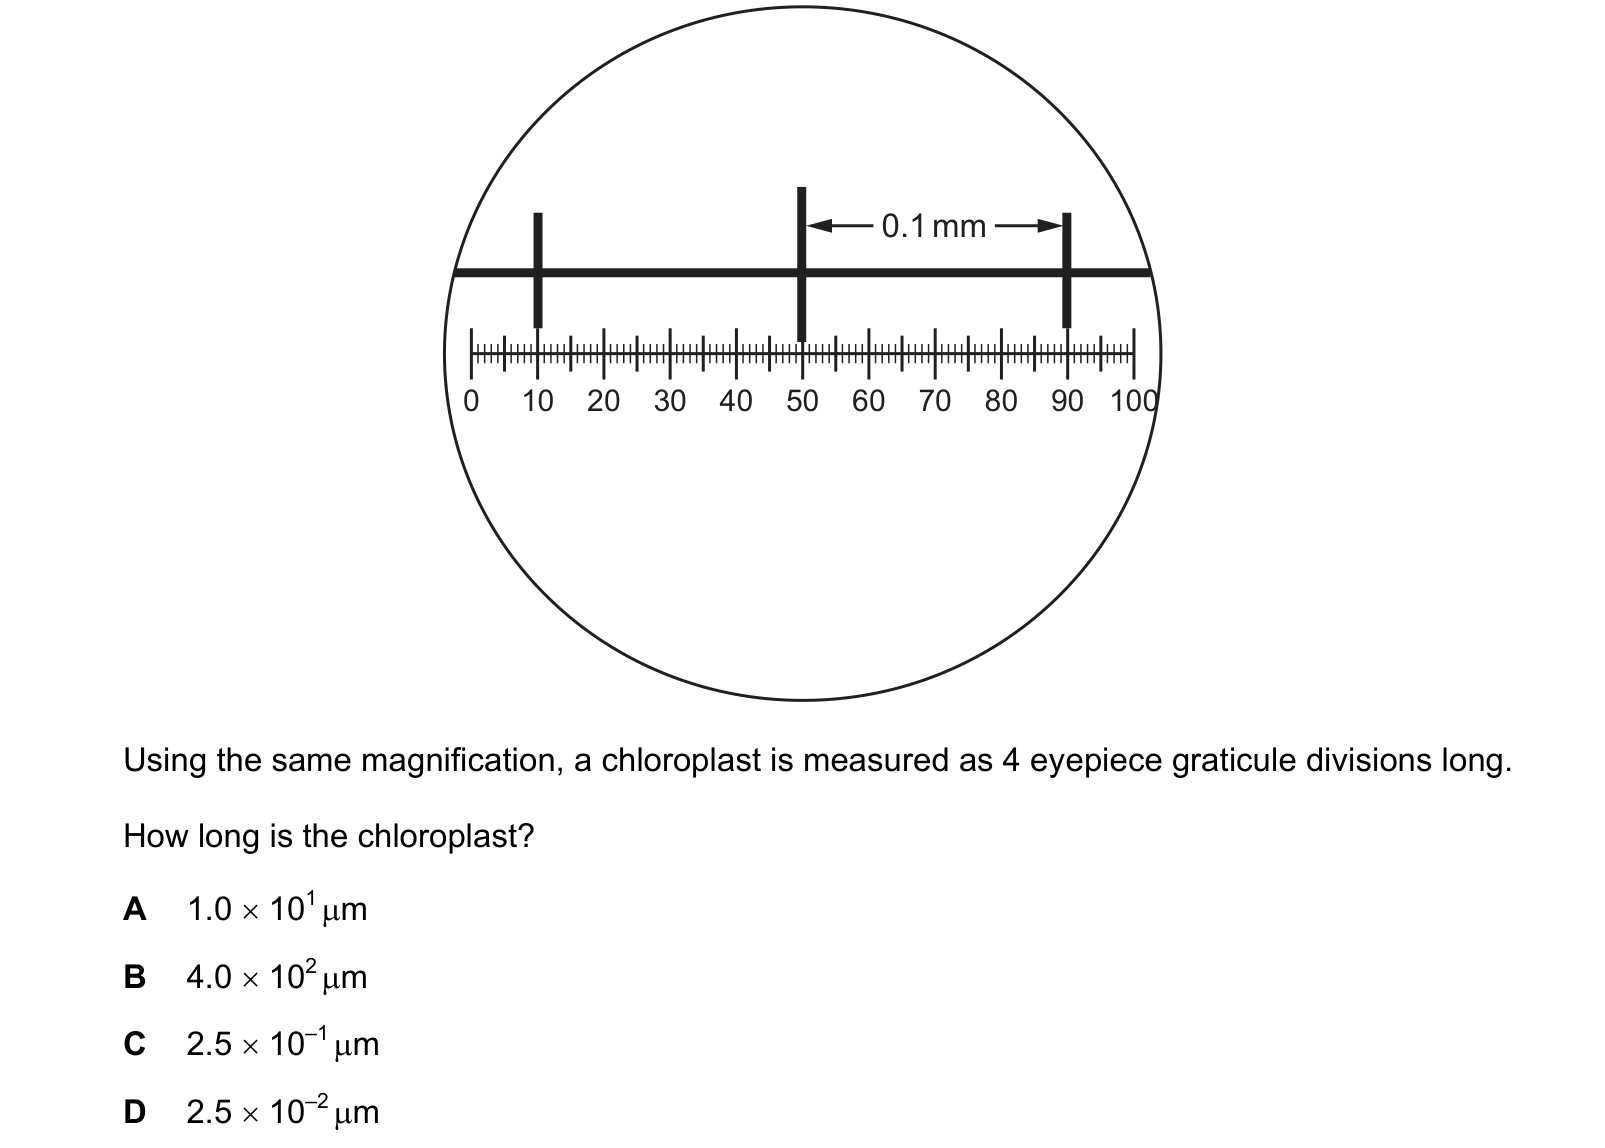
The diagram shows a stage micrometer scale viewed with an eyepiece graticule, using a magnification of ×200. Using the same magnification, a chloroplast is measured as 4 eyepiece graticule divisions long.
How long is the chloroplast?
Answer: A.
Calibration. The arrow labelled 0.1 mm runs from eyepiece reading 50 to reading 90, so 40 eyepiece divisions = 0.1 mm = 100 µm, and
1 eyepiece division = 100 ÷ 40 = 2.5 µm
Measurement. The chloroplast is 4 divisions long:
4 × 2.5 = 10 µm = 1.0 × 10¹ µm, which is A.
Every wrong option is the calibration used incorrectly. C, 2.5 × 10⁻¹ µm, is the size of one division divided by ten. D, 2.5 × 10⁻² µm, is the same slip twice over. B, 4.0 × 10² µm, is the four divisions multiplied by 100 instead of 2.5, and it is worth rejecting on sight: 400 µm is bigger than most whole plant cells, and a chloroplast has to fit inside one.
Ten micrometres is close to the real figure, which is why this question can be sanity checked from memory. Chloroplasts are a few micrometres across, mitochondria smaller still.
What the syllabus asks for on this topicSyllabus points
Syllabus points
- Use the units of measurement used in cell studies: millimetre, micrometre, nanometre.
- Calculate magnification and actual size using the formula, and rearrange it.
- Explain the difference between magnification and resolution.
- Compare light microscopes with electron microscopes, and transmission with scanning.
Related CIE 9700 Biology topics
Not the topic you were looking for? Describe what you are stuck on in your own words and we will take you to the notes that answer it.